Shooting Macros Section 2 – The Small World
by Peter Zack
Note: I hope some of Part 1 has helped understand macro equipment and shooting. As is the funny thing with a blog publishing setup, the articles are posted by date and you may be seeing the second part first. If so, go to Shooting Macros Section 1 and then come back to this next section in the series. In the next section on macro shooting, we’ll look at the math and magnification factors in a bit more detail. Also if you have a question or idea for this or other articles, contact us here
Depth of Field, Exposure and Focal Lengths
This will vary depending on the setup you use. With any of the setups, you will be quite close to the subject. With macro shooting the general rule will be that the shorter the focal length of the lens, the closer you will be to your subject. With a 50mm 1:1 macro lens, you will be approximately 10 cms away and with a 100mm lens, the distance is about 23 cms. With a bellows or long extension tubes, the shooting distance can be further or closer depending on the lens attached.

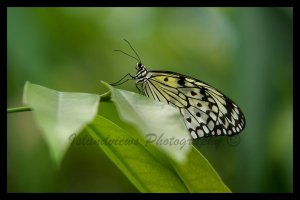
The depth of field (DOF) will also change with focal length. The 50mm will give about 1 cm (10mm) DOF at f16 where the 100mm might offer 8mm. Put a 100mm lens on a bellows and the DOF is even more shallow. So there are trade off’s with each. You might want the shorter lens to get in close but more light may be needed due to the shadows from your camera. Or the closeness will scare off a butterfly. Then the 100mm or even a longer lens will work best. The longer the lens, the tougher it can be to focus if the light is low and due to the more limited DOF.
The shot above allowed greater DOF. The spider was just sitting waiting for his next meal. So the shutter speed could be reduced and allow an aperture of f32 on a 105mm macro lens. This ensured most of the spider was in the zone of focus.
So what do we want with the DOF? It’s an ever present consideration with photographers who want to control the look of a shot. If you use your camera on auto, the camera will try to combine the best DOF settings (aperture) with enough shutter speed to freeze the action. When using a tripod in macros, you can lower the shutter speed if your subject is not moving much. So you may want to increase the DOF but going from f5.6 to f22 with a corresponding reduction in shutter speed or an increase in ISO to keep the shutter speeds higher. All three controls are linked to get a correct exposure. If I wanted to isolate the subject more, I’ll leave the lens wider open (eg F5.6or F8. ) and the areas in front and behind the subject will blur more. If I want more DOF and the subject is bigger or longer, I’ll stop the lens down as much as possible.
Extension Tubes, Bellows and a Lens
You have a few choices with a set of extension tubes or bellows. Extension tubes come in 2-4 sections of various thickness and you can increase your macro ability from 1:1 to as much as 2:1 depending on the lens attached. A 28mm lens will offer close to 2x life sized (2:1) on a typical 63mm (3 section) set  of extension tubes. 50mm will give you just over 1x (1:1) with the same set of tubes but a greater working distance. 100mm lens would be half life sized and an even greater room between the front of the lens and the subject.
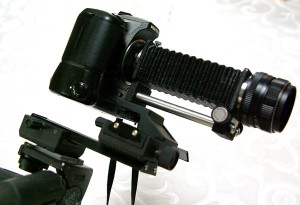
The advantage with a set extension tubes is they are smaller and fit in the camera bag like another lens. Many brands also have aperture control linkage to allow exposure control that isn’t all manual. Bellows offer greater extension but are bigger and often don’t allow exposure controls. So it’s all manual to get the right exposures. The plus is the length is variable. With tubes, you have to take a ring off or add one to get the right magnification you need. That slows you down and there is potential for dust getting inside while changing parts. With a set of bellows, just turn the knob to adjust the magnification. Want crazy magnification? Put a 28mm lens on a 150mm bellows (5.37x) or reverse a 50mm on the end. Now you can see the dots on the eye of the housefly.
My favourite setup is the bellows with a 105 or 135mm lens attached. Typically these lenses are very sharp from most brands and quite fast. So the lens will let in a lot of light for easier focusing and then can be stopped down to get the greatest DOF required. It also gives me the greatest working distances and is easy to get that close up shot without needing extra lights or scaring the insect away. But it is not the easiest or the quickest to use. Very tough to hand hold although with practice you can do it. Of course your neighbours will see the ‘mad scientist’ in the backyard once again chasing butterflies with the big bellows on the camera. Only thing you’re missing is the aluminum helmet to complete their impression of your insanity.
But with the addition of the focus rails attached to a tripod, the shots are sharp and I am using only natural light (with possibly a reflector to add more fill). With a bellows, a tripod is a must have item and it is an advantage in all macro photography.
Dedicated Macro Lens
Most macro shooters will get a dedicated macro lens to add to their kit. This can be the ideal lens in most cases. You may just want to do a little macro shooting from time to time and use the lens for mid length telephoto shooting or portraits. It serves all these uses very well. In addition, it’s generally an auto focus (AF) lens today for more general use. When considering this type of lens the most important feature is good manual focus control. That  the focus ring is smooth and easy to achieve critical focus and that the barrel turns more than the typical focus rotation of most AF lenses. Most normal AF lenses will only turn ¼ or less for fast AF performance so the motor does not spend all day spinning the lens barrel trying to focus a shot. A good macro may turn more than a full rotation. The longer the ‘throw’ or turn of the focus ring, the easier it is to get the exact focus point you want. It makes these slower as AF tele lenses but they still perform well. Many will have a limiter switch to speed up AF performance. Macro shooting at close distances is best with manual focus in most cases. The other thing you can do if closer than 1:1 is desired, is to add extension tubes to the macro lens if your camera platform allows this.
Light and Reflectors
The next thing is to light the scene. Natural light is best if possible. With a longer lens this can be possible and almost always gives the nicest colours. But often a flash is the only thing that will do the job. A flash can be used off camera with a cord or wireless setup to add light. You can also use a reflector. A cheap way to do this is, some of those Dollar stores sell the Mylar car windshield, sun reflectors. Get one and you can shape it around the subject to reflect sunlight or a flash. (Now add the aluminum helmet and the visual is complete). Use white cardboard or other white reflector to catch the sun’s light or from a flash. A ring flash, which mounts directly to the front of the lens provides nice even light and can really make lighting a subject very easy.
Be creative and you’ll come up with some great shots. Now just go find some subjects and go take some great images of ‘The Small World’.
 Taken with macro 50mm f2.8 Tripod and focus rail attached to camera. White side reflector card to balance light.
f16 ISO 200 1:1 Macro ratio
 Bellows at 130mm with focus rails and tripod. 58mm lens f16 ISO 200 Macro ratio 2.5x (2.5:1) No additional light or reflectors.
The next section contunues with part 3.
Saturday, February 7, 2009 at 07:43
This is one of the most comprehensive articles on macro photography.
Stumbled!
Saturday, February 7, 2009 at 14:22
Peter,
I like your macro article. I suggest an additional paragraph on extension tubes in regards to when they are used with a macro lens because it changes the formulas used to get the magnification.
Also, I have considered getting back into stacking lenses by using an AF lens like the FA 50mm and a 28mm reversed which would keep the lens couple to the body. This may be another section would be interested in adding. I always found stacking more attractive than simple reversing.
However, These days I have a couple of trinocular stereoscopes at home and a state of the art compound microscope at work if I need 4x or more magnification. I have the Olympus techs coming by to put the camera tube on there so I can use my K20D on that Olympus scope I just bought at work. I got an adapter for the Nikon lab camera and one for Pentax.
Again, nice article.
Sunday, February 8, 2009 at 16:03
Thanks Peter,
Have you ever tried the screw on 1:1 macro filters ?
Sunday, February 8, 2009 at 16:46
James, thanks for the look.
Blue, that information will come in the next section of this series in about a week or so. Great suggestions.
Javier, I have used them on a macro lens that was 1:2 on it’s own and had a 1:1 matched filter lens. They work well with the designated lens but can produce some unusual looking shots on another lens that they are not meant for. Very shallow DOF and harder to control. The best solution is the Raynox described in the first section. Add one of those to a longer lens (135mm+) and you get a very good macro lens (1:1 or more) with a fairly reasonable cost.
Monday, February 9, 2009 at 03:34
very comprehensive. Part III?
Tuesday, February 24, 2009 at 15:55
Hey, I just wanted to leave you guys a note and let you know that I think y’all are doing a fantasic job. Keep up the good work! J.
Tuesday, February 24, 2009 at 21:21
Thanks John! We appreciate your appreciation 🙂
Monday, March 2, 2009 at 03:36
For a beginner like me this is priceless.Thanks heaps.
Monday, March 2, 2009 at 05:31
Glad you got something from it John, grunter49 and everyone else. Hope you’re enjoying the site!
Thursday, March 12, 2009 at 14:00
Enjoying what I’m reading so far, Peter!